
Why a dutch oven works
Dutch ovens are popular because they solve the biggest problem in home baking: heat retention. When you combine a heavy pot with slow-fermented dough, you get a crust that actually crackles and an airy interior that most home ovens can't produce on their own.
Cast iron pots were originally for hearth cooking, but they are perfect for bread because they hold heat so well. Sourdough is even older, used for thousands of years before commercial yeast existed. It works because slow fermentation gives the bread better flavor and texture.
What truly sets the Dutch oven apart is its ability to trap steam. This steam creates a humid environment inside the pot during the initial stages of baking, preventing the crust from setting too quickly. This allows the loaf to expand fully – achieving impressive oven spring – before the crust develops its characteristic color and texture. The result is a loaf that's often compared to those from professional bakeries.
The process is deeply satisfying, connecting you to a tradition of baking that stretches back generations. It's not without its challenges. Building a starter takes time and patience, and mastering the shaping and proofing stages requires practice. But the reward—a warm, fragrant loaf of sourdough with a perfect crust—is well worth the effort. It’s a baking project that feels both ancient and incredibly modern.
Making your starter
A sourdough starter is the heart and soul of your bread. It’s a living culture of wild yeasts and bacteria that leavens the dough, imparting a distinctive tangy flavor. Creating a starter requires consistent feeding and a bit of patience. Begin with a simple mixture of flour and water – I recommend using a combination of unbleached all-purpose flour and whole wheat flour (about 50/50) to provide a wider range of nutrients for the yeast.
Start with 50 grams of flour and 50 grams of non-chlorinated water in a clean jar. Mix well, ensuring there are no dry clumps. Cover loosely (a lid resting on top, not sealed) and let it sit at room temperature (ideally 70-75°F). Over the next few days, you’ll begin to see signs of activity – bubbles forming, a slight increase in volume, and a tangy aroma. This is the yeast waking up!
Discarding a portion of the starter and feeding it fresh flour and water is crucial. This prevents the starter from becoming too acidic and ensures the yeast has enough food. A common feeding schedule is 1:1:1 – meaning 1 part starter, 1 part flour, and 1 part water (e.g., 50g starter + 50g flour + 50g water). Repeat this every 12-24 hours, depending on the temperature. Warmer temperatures accelerate fermentation, requiring more frequent feedings.
Troubleshooting is inevitable. Mold is a sign of contamination – discard the starter and start over. Inactivity can be caused by low temperatures or poor flour quality. Try moving the starter to a warmer location or switching to a different flour. Don't be discouraged by initial failures; it can take several days, even weeks, for a starter to become reliably active. Once established, you can store the starter in the refrigerator, feeding it weekly to maintain its vitality.
- Day 1: Mix 50g flour and 50g water in a jar and leave it on the counter.
- Day 2-3: Look for bubbles and a slight increase in volume. Begin discarding half and feeding 1:1:1.
- Day 4-7: Continue discarding and feeding. The starter should double in size within 4-8 hours after feeding.
- Day 7+: The starter is ready to use when it consistently doubles in size and has a pleasant, tangy aroma.
The recipe
This recipe builds on classic sourdough techniques, incorporating lessons learned from recent baking trends. It emphasizes a longer bulk fermentation to develop flavor and a precise hydration level for optimal crumb structure. We'll be working in grams for accuracy, as baking is a science! The goal is a loaf that balances a crisp crust with a soft, airy interior.
Ingredients: 400g bread flour, 300g water (75% hydration), 100g active sourdough starter (100% hydration), 8g salt. The high hydration is key for creating an open crumb, but requires careful handling. Bread flour, with its higher protein content, provides the gluten strength needed to support the structure. Salt controls the fermentation process and enhances flavor.
Autolyse: Combine the flour and water in a large bowl. Mix until just combined – no need to knead. Cover and let rest for 30-60 minutes. This allows the flour to fully hydrate, leading to a more extensible dough. This step is often overlooked, but it significantly improves the texture of the final loaf.
Bulk Fermentation: Add the starter and salt to the autolysed dough. Mix well, then begin a series of stretch and folds every 30-60 minutes for the first 2-3 hours. This develops gluten strength without traditional kneading. The total bulk fermentation time will vary depending on temperature (typically 4-6 hours), but judge readiness by looking for a 30-50% increase in volume and visible bubbles throughout the dough. Recent trends suggest longer, cooler bulk ferments can yield even more complex flavors.
I’m not convinced the extreme hydration doughs (80%+) are necessary for most home bakers. They require a lot of skill and can be difficult to handle. This 75% hydration strikes a good balance between ease of use and excellent results. The key is to develop the gluten through stretch and folds, not excessive kneading.
Shaping and proofing
Shaping is where you create the final form of your loaf and build tension, which is crucial for oven spring. Two common shapes are the boule (round) and the batard (oval). For a boule, gently flatten the dough into a circle, then fold the edges towards the center, creating a tight ball. For a batard, flatten the dough into a rectangle and fold it in thirds, like a letter. The tighter the shaping, the better the oven spring.
After shaping, the dough needs to proof. Cold proofing in the refrigerator for 12-24 hours is highly recommended. This slows down fermentation, developing flavor and making the dough easier to score. Place the shaped dough in a well-floured banneton basket (or a bowl lined with a floured cloth).
Assessing proofing readiness is tricky. The poke test is a good indicator: gently poke the dough with a floured finger. If the indentation slowly springs back, it’s ready to bake. If it springs back immediately, it needs more time. If the indentation remains, it's overproofed. Temperature and humidity significantly affect proofing times, so adjust accordingly. A warmer kitchen will speed up proofing, while a colder kitchen will slow it down.
Baking the bread
Preheat your Dutch oven (with the lid on) in the oven to 500°F (260°C) for at least 30 minutes. This ensures the pot is thoroughly heated, which is essential for creating a good crust. Carefully remove the hot Dutch oven from the oven. Gently place the proofed dough into the pot – you can use parchment paper to make this easier.
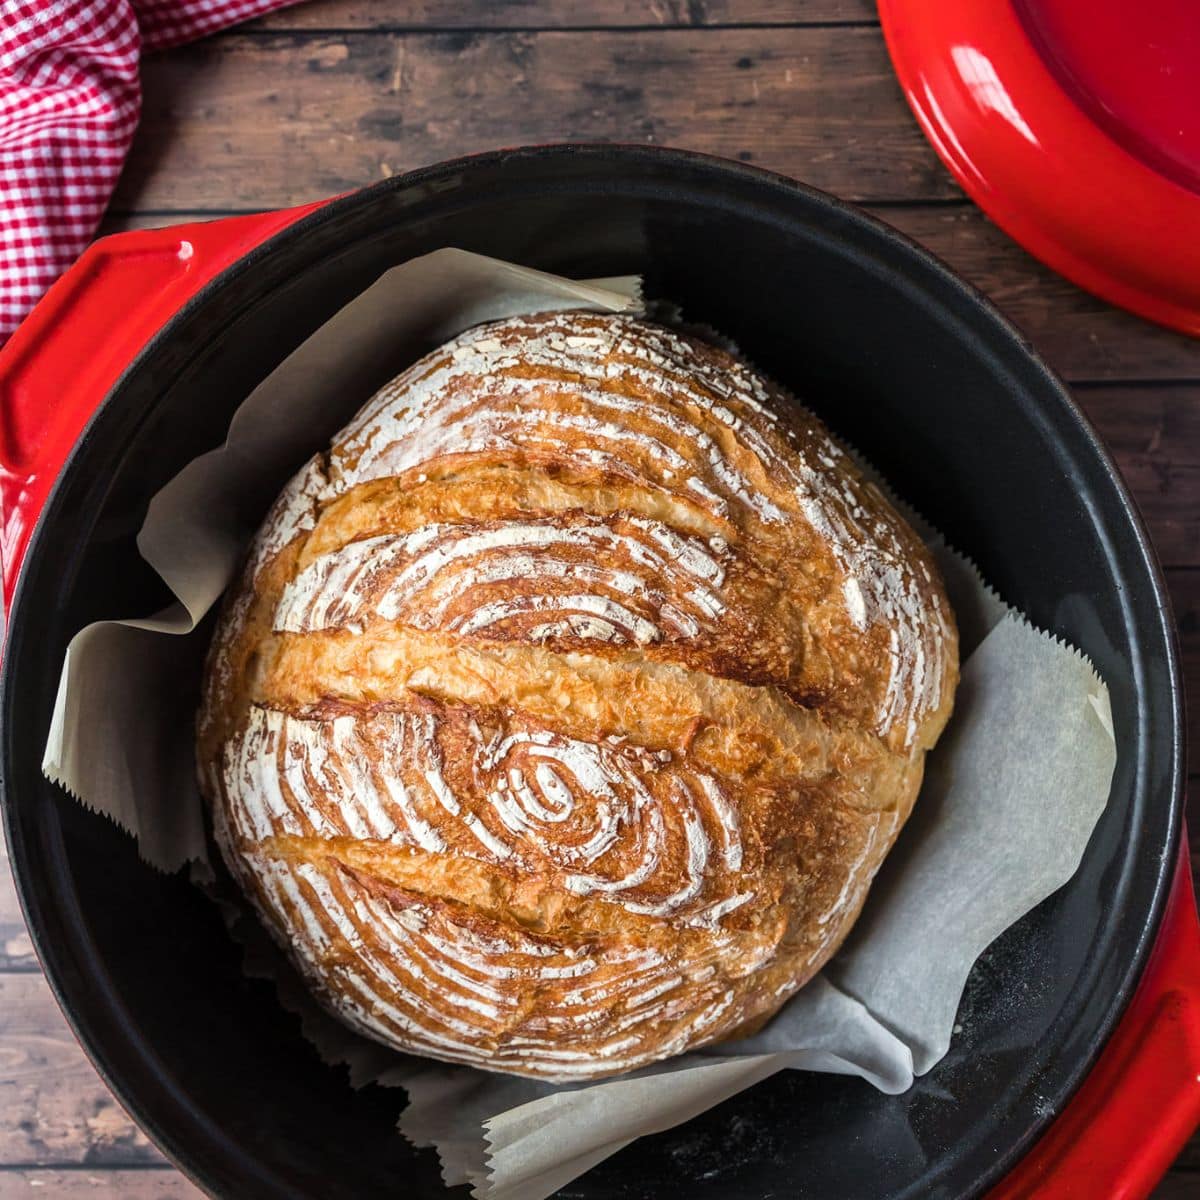
Scoring the dough with a sharp knife or lame allows the loaf to expand predictably during baking. Different scoring patterns can create beautiful designs, but the primary goal is to control the direction of expansion. A single, deep slash down the center is a good starting point.
Bake with the lid on for 20 minutes. This traps steam, creating a humid environment. Then, remove the lid and reduce the oven temperature to 450°F (232°C). Continue baking for another 25-35 minutes, or until the crust is deeply golden brown and the internal temperature reaches 205-210°F (96-99°C). Southern Cast Iron emphasizes the importance of a well-seasoned Dutch oven for even heat distribution and consistent results.
Baking times will vary depending on your oven. Start checking for doneness around the 30-minute mark. If the crust is browning too quickly, reduce the temperature slightly. If the loaf isn't browning enough, increase the temperature or extend the baking time.
Common mistakes
Flat Loaf: This is often caused by weak starter activity or insufficient gluten development. Ensure your starter is reliably doubling in size before using it, and perform enough stretch and folds during bulk fermentation. Gummy Interior: Typically a result of underbaking or overproofing. Ensure the internal temperature reaches 205-210°F and avoid letting the dough proof for too long.
Overly Sour Taste: A long bulk fermentation or cold proof can increase sourness. Reduce the fermentation time or use a smaller amount of starter. Tough Crust: Can be caused by baking at too high a temperature or for too long. Reduce the temperature or shorten the baking time. Uneven Baking: Ensure your oven is properly calibrated and that the Dutch oven is centered in the oven.
Adjusting the recipe for different flours is possible, but requires some experimentation. Whole wheat flour absorbs more water than bread flour, so you may need to increase the hydration level slightly. Rye flour can also affect the texture and flavor of the bread. Start by substituting a small percentage of bread flour with the alternative flour and adjust as needed.


No comments yet. Be the first to share your thoughts!