
The first seasoning
Seasoning a cast iron dutch oven isn’t about applying a coating; it's about a chemical transformation. It’s the process of polymerization – where the oil breaks down under heat and bonds to the iron, creating a smooth, non-stick surface. This isn't a one-time task, but the foundation for a lifetime of cooking. A well-seasoned dutch oven is more than just easier to use, it’s protected from rust and becomes naturally non-stick.
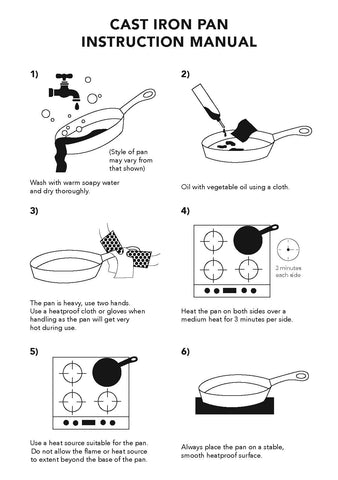
The traditional oven method is still the gold standard. Start by thoroughly cleaning your new dutch oven with hot, soapy water. Yes, soap. For the initial seasoning, it's fine. Dry it completely, then apply a very thin coat of oil – I’ll discuss oil choices in the next section, but grapeseed oil is a great starting point. Wipe away as much oil as you can; it should look almost dry. Then, place the dutch oven upside down in a preheated oven at 450-500°F (232-260°C) for one hour. Let it cool completely in the oven.
Many people make the mistake of using too much oil, leading to a sticky, uneven finish. Think of it like this: you’re not trying to coat the pan, you’re trying to encourage a chemical reaction. Another common error is not heating the oven to a high enough temperature. 450°F is the minimum, but 500°F generally yields better results. Repeat this process 3-4 times for a solid base layer. This initial investment of time pays dividends in the long run.
Don’t be discouraged if the first seasoning isn’t perfect. It’s a process that builds over time with use. The more you cook with your dutch oven, the better the seasoning will become. It’s a living surface, constantly evolving with each meal. Consider the initial seasoning a starting point, not the finish line.
Choosing the right oil
The oil you pick changes how well the seasoning holds up. People used to suggest flaxseed oil because it hardens quickly, but I've found it flakes off too easily. I prefer grapeseed oil. It has a high smoke point and creates a tough layer that doesn't chip as much.
Canola oil is another readily available option with a decent smoke point, but it doesn't polymerize quite as effectively as grapeseed. Avocado oil is gaining popularity, boasting a very high smoke point and good polymerization, but it’s considerably more expensive. Sunflower oil is similar to canola in performance. Rendered lard, traditionally used, creates a very durable seasoning, but can impart a slight flavor to foods and may go rancid if not properly stored.
Shortening is a debated topic. While it can work, it doesn’t polymerize as well as oils and can leave a greasy residue. Smoke point is a critical factor; you want an oil that won’t break down and become sticky before it polymerizes. Avoid olive oil for seasoning – its low smoke point and high acidity make it a poor choice. The goal is a hard, smooth, non-reactive surface, and not all oils deliver that.
- Flaxseed Oil: High polymerization, but prone to flaking.
- Grapeseed oil is my top choice because it handles high heat well and bonds tightly to the iron.
- Canola Oil: Readily available, decent performance.
- Avocado Oil: High smoke point, good polymerization, expensive.
- Sunflower Oil: Similar to canola.
- Rendered Lard: Durable, potential flavor impact.
- Avoid olive oil. It smokes at low temperatures and leaves a sticky, acidic residue instead of a hard finish.
Beyond the Oven: Stovetop & Grill Seasoning
While the oven provides the most even heat, stovetop and grill seasoning can be useful for quickly building a base layer, or if you lack access to an oven. These methods require more attention to detail, as temperature control is more challenging. For stovetop seasoning, heat the dutch oven over medium-high heat, apply a thin coat of oil, and constantly move it around to prevent hot spots.
Grill seasoning is similar, but requires even more vigilance. Keep the dutch oven moving and monitor the temperature closely. Both methods are less likely to produce a perfectly even finish compared to oven seasoning, and you may end up with patchy areas. To address this, focus on areas that appear less seasoned, reapplying oil and continuing to heat.
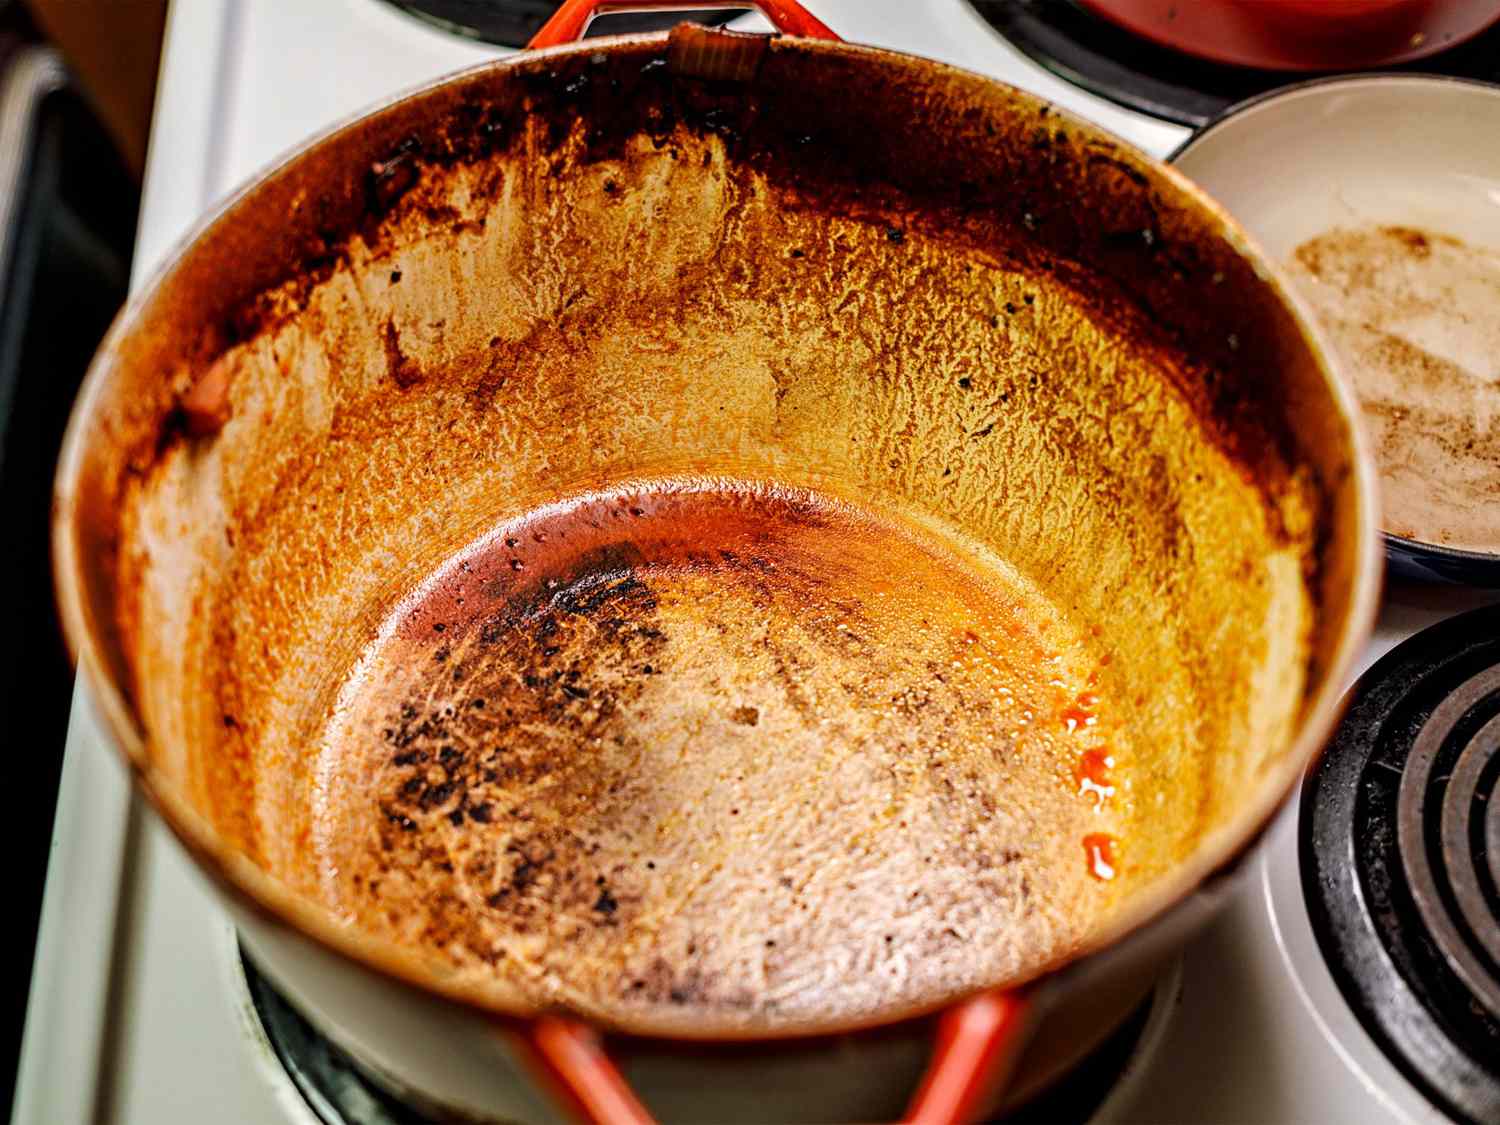
Fixing patchy seasoning involves repeating the seasoning process, focusing on the bare spots. Don’t be afraid to strip the seasoning and start over if the results are unsatisfactory. It’s better to have a consistently seasoned surface than a patchwork of uneven layers.
Daily Care: Cleaning Your Dutch Oven
Proper cleaning is paramount to maintaining your dutch oven’s seasoning. Hot water is your best friend. Immediately after use, while the dutch oven is still warm, rinse it with hot water. Use a soft sponge or nylon brush to remove any food particles. Avoid abrasive cleaners and steel wool – they will strip the seasoning. For stuck-on food, simmer water in the dutch oven for a few minutes to loosen it.
You can use soap. The old rule about avoiding it comes from a time when soap contained lye, which actually stripped seasoning. Modern Dawn or similar brands won't hurt the finish. If the pot is greasy, use a drop of soap and a sponge. If you see rust, you'll need to scrub it off and re-oil it right away.
My personal method for cleaning after a messy meal involves rinsing with hot water, using a nylon brush to remove debris, and then simmering a cup of water for a few minutes. This loosens any stubborn bits. After drying, I apply a very light coat of oil to prevent rust. This isn't re-seasoning, just maintaining the existing layer. Remember, the goal is to clean without removing the seasoning.
How to fix rust
Rust happens, even with diligent care. For light surface rust, a scrub with steel wool (fine grade) can often remove it. Be thorough, but avoid excessive force. For more severe rust, a vinegar soak is often necessary. Mix equal parts white vinegar and water in the dutch oven, ensuring the rusted areas are submerged. Soak for no more than 30 minutes, checking progress frequently. Prolonged soaking can damage the iron.
Electrolysis is a more advanced method, but highly effective for heavily rusted dutch ovens. It involves using an electrical current to remove the rust. However, this method requires caution and a thorough understanding of electrical safety. I recommend researching it extensively before attempting it. After removing the rust, regardless of the method used, you must re-season the dutch oven immediately to prevent further corrosion.
Don't panic if your dutch oven is heavily rusted. It’s often salvageable with some elbow grease and patience. The key is to address the rust promptly and re-season thoroughly. A rusty dutch oven isn’t ruined; it’s simply in need of some rehabilitation.
Re-Seasoning: When and How
You’ll need to fully re-season your dutch oven if the seasoning is significantly damaged, flaking, or if you’ve removed rust. Signs you need to re-season include food consistently sticking, a dull, uneven surface, or visible rust. The process is similar to the initial seasoning: clean the dutch oven thoroughly, apply a thin coat of oil, and bake at 450-500°F (232-260°C) for an hour, repeating 3-4 times.
Troubleshooting is key. If the seasoning is flaking, you likely used too much oil or didn’t heat it to a high enough temperature. If it’s tacky, the oil didn’t fully polymerize – increase the baking time or temperature. It's not always necessary to strip the dutch oven down to bare metal. Sometimes, simply adding a few more layers of seasoning can repair minor imperfections.
Achieving a perfectly smooth, even finish takes practice. Don’t be afraid to experiment with different oils and baking times. The goal is a hard, non-stick surface that will last for years. Remember, each use contributes to the seasoning, making it stronger and more resilient.
Long-Term Storage: Protecting Your Investment
Proper storage is often overlooked, but crucial for preventing rust. After cleaning and drying your dutch oven, apply a very light coat of oil to all surfaces, inside and out. Wipe away any excess. Store it in a dry location. Consider placing a paper towel inside to absorb any residual moisture and a silica gel packet to further reduce humidity.
The debate over storing with the lid on or off is ongoing. Storing with the lid on can trap moisture, increasing the risk of rust. However, storing with the lid off can expose the lid to rust. I recommend leaving a paper towel between the dutch oven and the lid to allow for some airflow. A cool, dry pantry is the ideal storage location.
No comments yet. Be the first to share your thoughts!