
why seasoning is more than a non-stick trick
Many people believe seasoning cast iron is solely about creating a non-stick surface, and while that's a benefit, it's far from the whole story. Proper seasoning builds a protective layer that prevents rust, a cast iron’s biggest enemy. More importantly, the seasoning isn’t a coating on the iron; it is the iron, transformed through a process called polymerization. This creates a smooth, relatively inert cooking surface that improves with age.
Polymerization happens when fats are heated to the point they break down and bond with the iron, forming a hard, plastic-like substance. Multiple layers of this polymerized oil create the seasoning, gradually filling in the microscopic pores of the cast iron. It’s a continuous process, not a finish line. The idea that you need to constantly re-season is a misconception—consistent use and proper care are more impactful than obsessive re-seasoning.
Factory seasoning, often found on newer dutch ovens, is a good starting point, but it’s typically thin and uneven. It’s meant to protect the iron during shipping and storage, not to provide a robust cooking surface. I always recommend building upon factory seasoning with a dedicated seasoning process, especially for optimal performance. Don't expect a factory-seasoned pot to behave like one you’ve meticulously cared for over years.
how to season from scratch
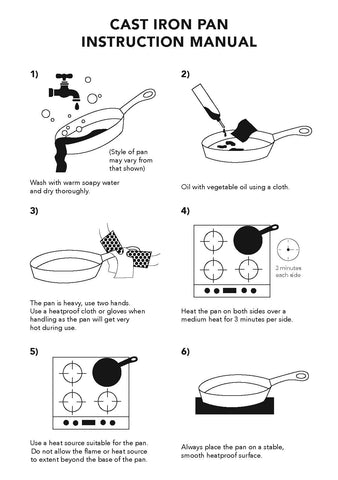
Seasoning a new, or stripped, cast iron dutch oven requires a bit of effort but is absolutely crucial. Begin by thoroughly cleaning the dutch oven with hot, soapy water. Yes, soap is okay at this stage – you’re removing any manufacturing residue, not a delicate seasoning. Dry it completely with a clean towel. Any remaining moisture will hinder the process.
I use grapeseed oil. It has a high smoke point and bonds well without the flaking you get from flaxseed. Flaxseed used to be the trendy choice, but it's too finicky for most people. Canola works if you're on a budget, but the finish isn't as tough.
Apply a very thin coat of oil to every surface of the dutch oven – inside, outside, lid, handle. This is where many people go wrong; too much oil leads to a sticky mess. Use a clean cloth or paper towel to wipe away any excess, leaving only a barely perceptible sheen. Bake the dutch oven upside down in a preheated oven at 450-500°F (232-260°C) for one hour. Place a baking sheet on the rack below to catch any drips.
After one hour, turn off the oven and allow the dutch oven to cool completely inside the oven. This slow cooling process is important for proper polymerization. Repeat this process at least three to four times, and ideally six to eight, for a solid base seasoning. Be prepared for a noticeable smell during the baking process – adequate ventilation is essential. The more coats, the better, but diminishing returns set in after about six cycles.
- Wash with hot, soapy water and dry thoroughly.
- Apply a very thin coat of oil to all surfaces.
- Bake upside down at 450-500°F (232-260°C) for one hour.
- Cool completely inside the oven.
- Repeat steps 3 and 4 at least 3-4 times.
the best oils for the job
Choosing the right oil is critical for successful seasoning. Smoke point is important – you want an oil that can withstand high temperatures without breaking down and becoming rancid. However, smoke point isn't the only factor; the oil’s fatty acid composition, particularly its linolenic acid content, plays a significant role in polymerization. Flaxseed oil boasts the highest linolenic acid content, theoretically making it the best, but it’s also the most prone to flaking and requires meticulous application.
Grapeseed oil, with a smoke point around 420°F (216°C), provides a good balance. It polymerizes well and is relatively easy to work with. Canola oil (smoke point around 400°F/204°C) is the most affordable and readily available, but it doesn’t polymerize as effectively as grapeseed or flaxseed. Vegetable oil is generally not recommended due to its lower smoke point and tendency to become sticky. Coconut oil, while popular for cooking, isn't ideal for seasoning due to its lower linolenic acid content.
Personally, I prefer grapeseed oil. It’s reliable, produces a durable seasoning, and doesn’t require the same level of precision as flaxseed oil. Walnut oil is sometimes mentioned, but I'm not convinced of its superiority and its cost is significantly higher. Regardless of the oil you choose, remember that thin coats are key. A heavy coat will just lead to a sticky, uneven finish. It's a time investment, but it pays off in the long run.
- Flaxseed oil: It creates a hard finish but often flakes off in sheets after a few months.
- Grapeseed Oil: Good balance of performance and ease of use.
- Canola Oil: Affordable, readily available, less effective polymerization.
- Vegetable Oil: Not recommended – low smoke point, sticky finish.
Common Seasoning Oils for Cast Iron: A Comparative Overview
| Oil Type | Smoke Point | Polymerization | Cost | Ease of Use | Notes |
|---|---|---|---|---|---|
| Flaxseed Oil | Low | Fast | Higher | Hard | Creates a very hard, durable seasoning, but is prone to flaking if applied too thickly. Requires multiple thin coats. |
| Grapeseed Oil | Medium-High | Medium | Medium | Easy | Good all-purpose oil. Relatively neutral flavor. Can become sticky if layers are too thick. |
| Canola Oil | Medium | Medium | Low | Easy | Widely available and affordable. Good initial seasoning, but may not be as durable as other options. |
| Vegetable Oil | Medium | Slow | Low | Easy | Another affordable and accessible option. Takes a long time to build up a strong seasoning layer. |
| Shortening (Crisco) | Medium | Slow | Low | Easy | Traditional choice for seasoning. Can leave a slightly greasy feel if not heated sufficiently. |
| Avocado Oil | High | Medium-Fast | High | Easy | Increasingly popular due to its high smoke point and good polymerization. More expensive than other options. |
Qualitative comparison based on the article research brief. Confirm current product details in the official docs before making implementation choices.
washing and drying without the stress
Once your dutch oven is seasoned, proper daily care is essential to maintain that seasoning. The myth that you should never use soap on cast iron is outdated. Modern dish soaps are much gentler than those of the past and won’t strip away a well-established seasoning. However, avoid harsh detergents and abrasive cleaners. Warm water and a soft sponge are usually sufficient.
A chainmail scrubber can be incredibly helpful for removing stuck-on food without damaging the seasoning. Avoid steel wool or abrasive scouring pads, as they will remove the seasoning. The most important step is thorough drying. Any remaining moisture will lead to rust. I recommend drying the dutch oven immediately after washing, then placing it on a stovetop burner over low heat for a few minutes to ensure it’s completely dry.
After drying, apply a very light coat of oil – the same oil you used for seasoning – to all surfaces. This helps to replenish the seasoning and prevent rust. Wipe away any excess oil with a clean cloth. Gentle cleaning and thorough drying are the cornerstones of cast iron maintenance. It's about preserving the seasoning, not punishing it.
fixing rust and damage
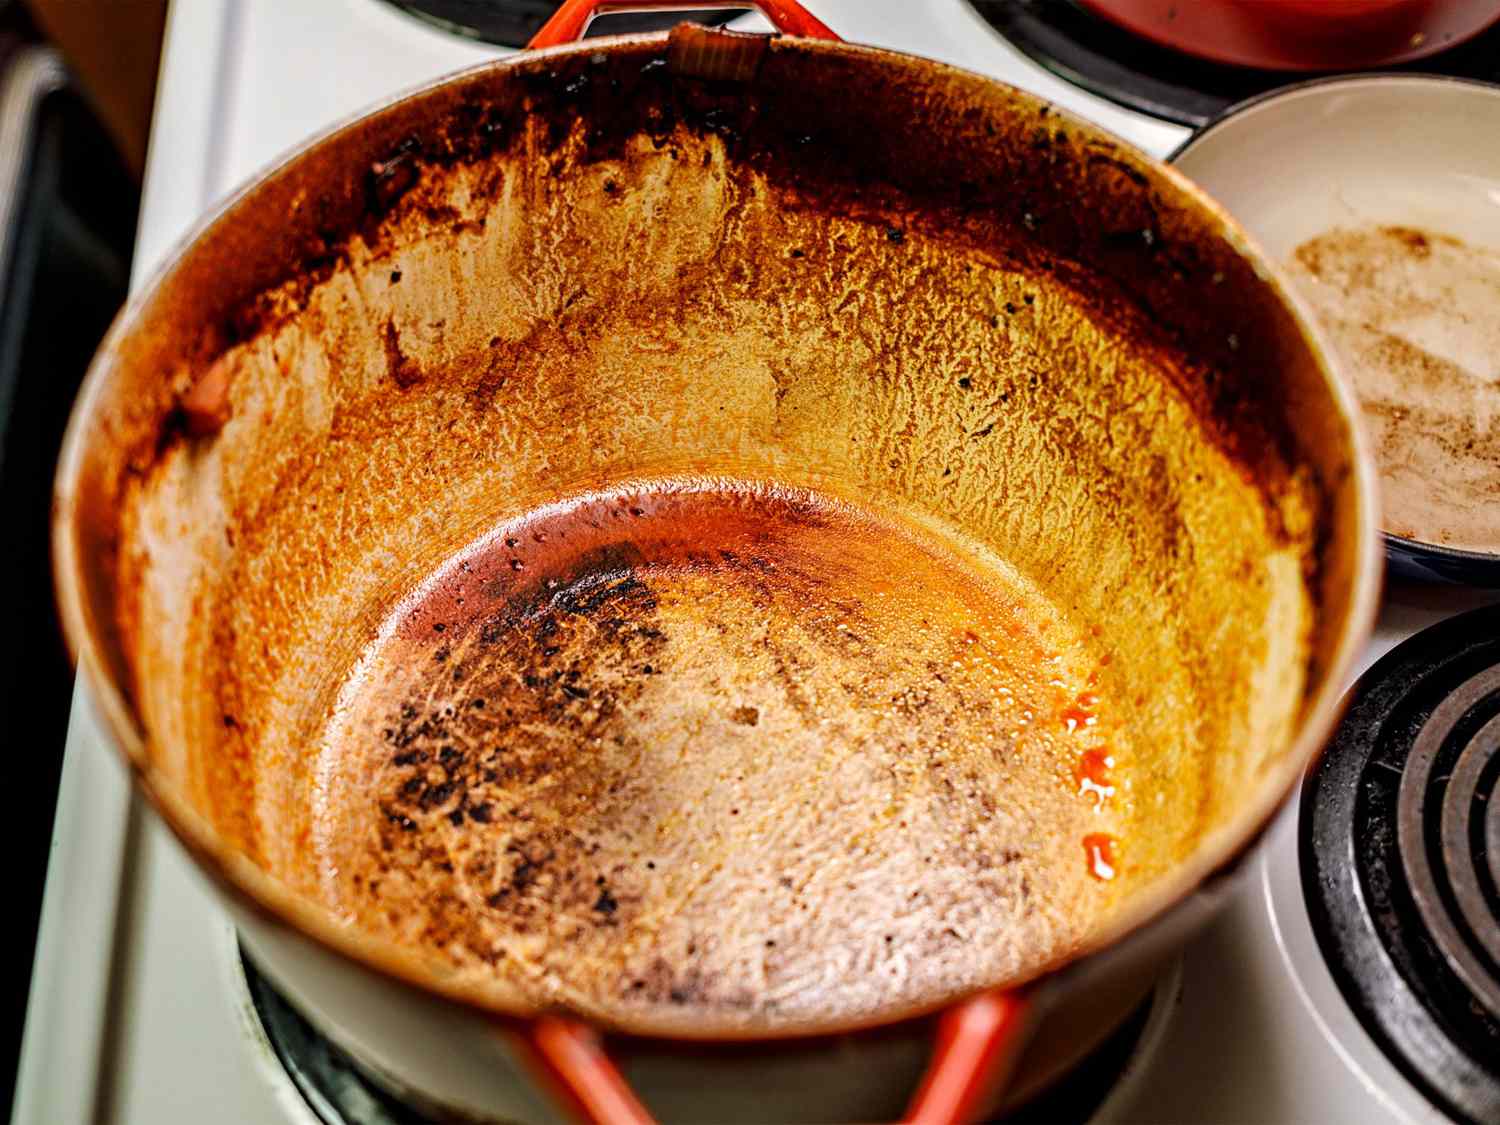
Despite your best efforts, rust can sometimes appear. Don’t panic. Surface rust is usually easily removed. For minor rust spots, a vinegar soak can be effective. Mix equal parts white vinegar and water, and submerge the affected area for no more than 30 minutes. Check frequently – prolonged exposure to vinegar can damage the iron itself. Scrub the rust away with steel wool or a scouring pad.
For more stubborn rust, electrolysis can be used, but it requires specialized equipment and knowledge. Always exercise extreme caution when working with electricity. Once the rust is removed, thoroughly wash and dry the dutch oven. You’ll likely have removed some of the seasoning in the process, so re-seasoning is necessary. Repeat the initial seasoning process described earlier.
Distinguish between surface rust – a light orange discoloration – and deep pitting – actual corrosion of the iron. Surface rust is easily remedied. Deep pitting indicates significant damage and may require professional restoration. Be realistic about the effort involved in restoring a heavily rusted dutch oven; sometimes, it’s simply not worth it. It's a reminder that prevention – consistent care and drying – is far easier than repair.
building a long-term patina
Maintaining a well-seasoned dutch oven is a continuous process, not a one-time event. Frequent use is the best maintenance. Cooking fatty foods, like bacon or sausage, will naturally contribute to the seasoning. The more you use it, the better it gets. Avoid cooking highly acidic foods, such as tomatoes or citrus fruits, for extended periods, as they can break down the seasoning.
If you do cook acidic foods, re-oil the dutch oven immediately afterward. Over time, a beautiful “patina” will develop – a dark, smooth, and almost glass-like surface. This patina is a sign of a well-loved and well-maintained dutch oven. It’s not just about aesthetics; the patina actually enhances the non-stick properties and protects the iron.
Think of seasoning as a living thing that responds to your cooking habits. It requires care and attention, but the rewards – a durable, versatile, and heirloom-quality cooking tool – are well worth the effort. Don’t be afraid to experiment and learn what works best for you and your cooking style.
common fixes for sticky pots
Sticky spots can often be resolved by simply continuing to use the dutch oven. The heat from cooking will help to polymerize the oil and smooth out the surface. For more persistent sticky spots, try baking the dutch oven upside down again, with a slightly higher temperature. Uneven seasoning is common, especially in the beginning. Continue seasoning, and it will even out over time.
Flaking seasoning usually indicates too much oil was applied during the seasoning process. If the flaking is severe, you may need to strip the seasoning and start over. Food still sticking? Your seasoning may not be thick enough. Continue seasoning, and ensure you’re using enough oil when cooking. Seasoning transfer to food is normal, especially with a newer seasoning, and will decrease over time.
If you encounter any of these issues, don’t be discouraged. Cast iron is remarkably forgiving. Sometimes, starting over with a fresh seasoning is the best course of action. It’s a learning process, and every dutch oven has its own unique character. Don’t be afraid to experiment and find what works best for you.
No comments yet. Be the first to share your thoughts!