
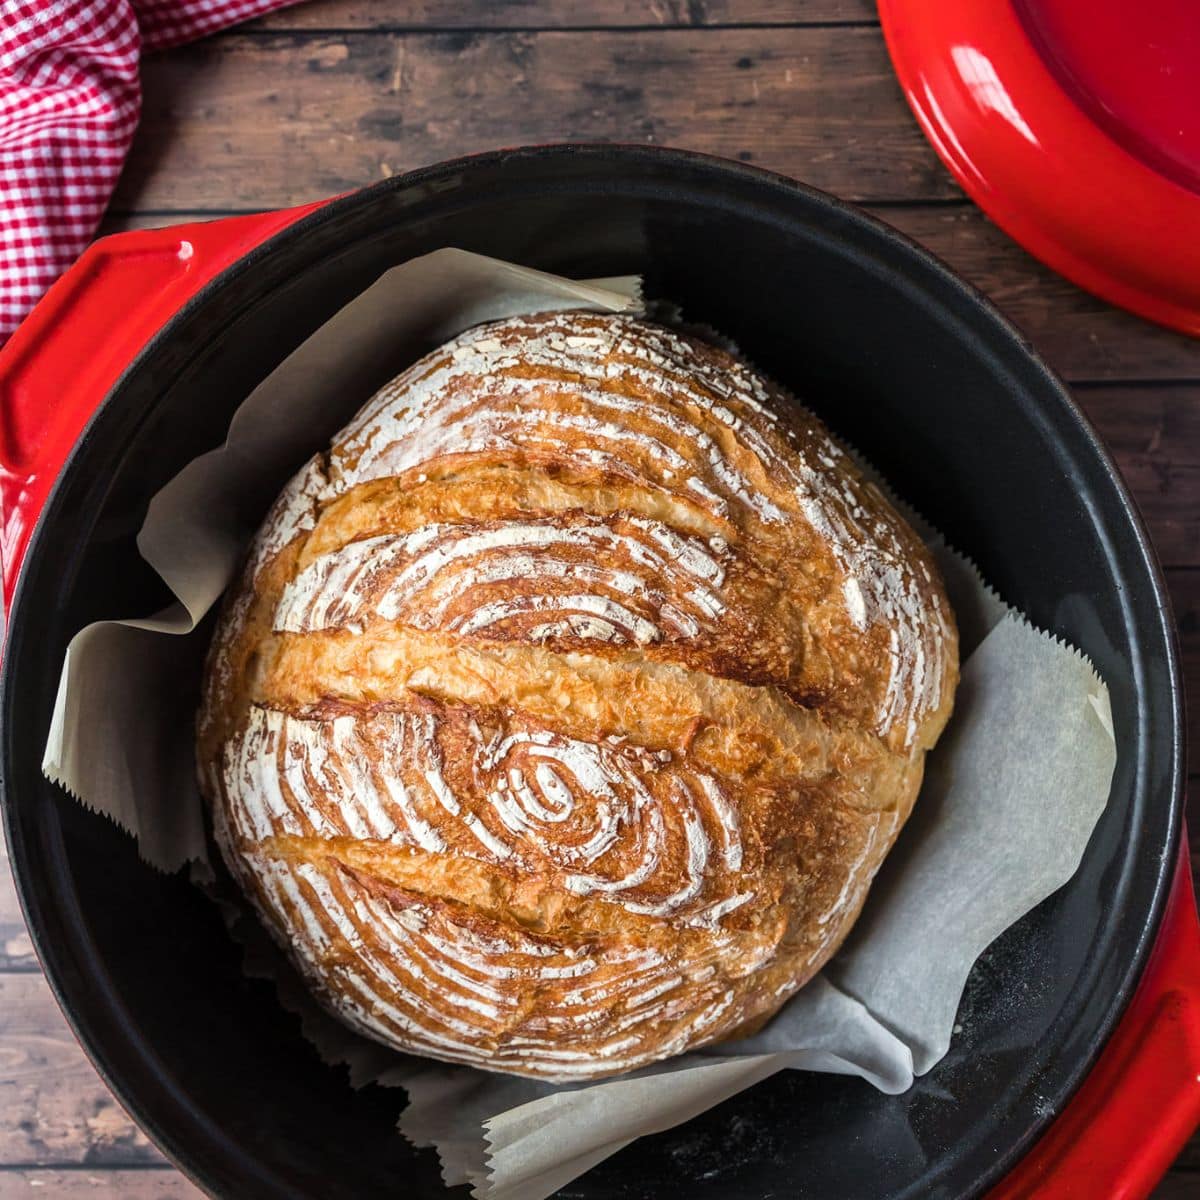
Sourdough, Simplified: 5 Ingredients
Sourdough used to feel like a baker's secret, but that's not true. This recipe uses only five ingredients to create a loaf that rivals anything from a professional bakery. It’s designed for beginners.
This method skips intensive kneading, relying on time and a Dutch oven for flavor and texture. A Dutch oven is essential for achieving that signature sourdough crust. Its cast iron provides even heat distribution and creates a steamy environment, mimicking a professional bread oven.
This recipe maximizes flavor with minimal effort. It's designed to be accessible for everyone, regardless of experience.

The Core Ingredients & Their Roles
Here are the five ingredients and their roles. Flour: Bread flour is ideal for its higher protein content, which develops more gluten for structure. All-purpose flour works too, though the loaf will be slightly less chewy. King Arthur and Bob’s Red Mill flours both perform well, with King Arthur often yielding a slightly more open crumb.
Water: Activates yeast and hydrates flour, initiating gluten development. Use warm water (80-90°F); too hot will kill the yeast. Salt: Controls yeast activity, preventing rapid rising and unpleasant taste. About 1.5 teaspoons is ideal.
Sourdough starter: A living culture of wild yeasts and bacteria that gives sourdough its unique tang and flavor. Your starter should be bubbly and active, doubling in size within a few hours of feeding. A sluggish starter results in a dense, flat loaf. Patience is also essential for sourdough success.
Building Your Starter (If Needed)
If you don’t have an active sourdough starter, creating one is simple. For the first seven days, feed a mixture of flour and water to encourage wild yeast and bacteria growth. Start with equal parts (50g each) of flour and water in a clean jar. Mix well, cover loosely, and let it sit at room temperature.
For the next six days, discard half the mixture and feed it with another 50g of flour and 50g of water. Bubbles forming are a good sign. The discard can be used in pancakes or waffles. It can take a couple of weeks for a starter to become reliably active. A detailed guide is available on My Dutch Oven.
Common problems include mold (discard and start over) and sluggish activity (try a warmer location or different flour). Maintaining a starter takes practice and consistency. A healthy starter is the foundation of great sourdough.
The Recipe: Step-by-Step
In a large bowl, combine 3 cups (384g) of flour, 1 ½ teaspoons (9g) of salt, and 1 ½ cups (360ml) of warm water. Add 100g of active sourdough starter. Mix until just combined; the dough will be shaggy and sticky. Avoid overmixing to prevent developing too much gluten at this stage.
Cover the bowl and let it rest for 30 minutes for autolyse, allowing the flour to fully hydrate. After 30 minutes, perform stretch and folds: gently grab a section of dough, stretch it upwards, and fold it over. Rotate the bowl and repeat 4-5 times. This strengthens the gluten structure without kneading. Repeat stretch and folds every 30 minutes for 2-3 hours.
After bulk fermentation (2-3 hours), gently shape the dough into a round or oval; a rustic shape is part of the charm. Place the shaped dough in a well-floured banneton basket or a floured cloth-lined bowl. Cover and refrigerate for 12-24 hours for a slow, cold proof that develops flavor and makes the dough easier to handle. Adjust dough quantity for Dutch ovens smaller or larger than 6 quarts.
- Combine flour, salt, water, and starter.
- Rest for 30 minutes (autolyse).
- Perform stretch and folds every 30 minutes for 2-3 hours.
- Shape the dough and refrigerate for 12-24 hours.
Dutch Oven Baking: Heat & Timing
Preheat your Dutch oven with the lid on to 450°F (232°C) for at least 30 minutes. The hot Dutch oven creates the steamy environment for sourdough's signature crust. Carefully remove it from the oven.
Gently place the proofed dough into the hot Dutch oven. Score the top with a sharp knife or lame to control expansion during baking. Cover and bake for 20 minutes. Remove the lid and bake for another 25-30 minutes, or until the crust is deeply golden brown.
Covered baking creates steam for a soft, chewy interior. Removing the lid crisps the crust and develops color. If the crust browns too quickly, reduce the oven temperature slightly. A pale crust suggests the oven temperature is too low. Baking at 450°F usually works, but oven adjustments may be needed.
Troubleshooting & Common Mistakes
A flat loaf often means a weak starter or under-proofing. Ensure your starter is active and the dough proofs for 12-24 hours in the refrigerator. A dense crumb can result from insufficient gluten development or bulk fermentation. Perform stretch and folds correctly and allow adequate rising time. A burnt crust indicates the oven temperature is too high; reduce it by 25°F.
A gummy interior means the loaf likely hasn't baked long enough. Continue baking until the internal temperature reaches 205-210°F (96-99°C). A sluggish starter can cause many issues; try feeding it more frequently or using a different flour. Consistency is key.
Don't be afraid to use plenty of flour when handling sticky dough. A little extra flour won't hurt, but too much can make the dough tough. Sourdough is forgiving; experiment and learn from your mistakes.
Beyond the Basics: Flavor Variations
Once you’ve mastered the basic recipe, the possibilities are endless. Adding herbs like rosemary or thyme (about 1-2 tablespoons) to the dough is a simple way to elevate the flavor. Cheese (½ cup shredded cheddar, parmesan, or Gruyère) adds a savory dimension. Olives (½ cup, pitted and chopped) or sun-dried tomatoes (¼ cup, oil-packed, drained) provide a Mediterranean twist.
When adding ingredients, be mindful of their moisture content. Wet ingredients may require a slight adjustment to the flour-to-water ratio. For example, if adding ½ cup of chopped olives, reduce the water by 2 tablespoons. You can also experiment with different types of flour. Substituting 25-50% of the bread flour with whole wheat or rye flour will add a nutty, complex flavor.
Here are a few ideas to get you started: Rosemary Garlic Sourdough (2 tbsp rosemary, 2 cloves minced garlic), Olive & Herb Sourdough (½ cup olives, 1 tbsp herbs), Cheddar Jalapeño Sourdough (½ cup cheddar, 1-2 jalapeños, minced). A little experimentation can go a long way!
Dutch Oven Care: Keeping it Seasoned
Maintaining a well-seasoned Dutch oven is essential for optimal performance and longevity. After each use, scrape out any food residue and wash the Dutch oven with warm water. Avoid using harsh soaps, as they can strip away the seasoning. Dry the Dutch oven thoroughly and apply a thin coat of oil (flaxseed oil is excellent) to the interior.
Store the Dutch oven in a dry place. We have a detailed guide on Dutch oven care on My Dutch Oven, covering everything from initial seasoning to rust removal. Proper care will ensure your Dutch oven lasts for generations. Remember, a well-cared-for Dutch oven is a baker's best friend.
Dutch Oven Material Comparison for Sourdough Baking
| Material | Heat Retention | Reactivity with Sourdough | Ease of Cleaning | Durability |
|---|---|---|---|---|
| Cast Iron | Excellent - maintains consistent temperatures for optimal oven spring and crust development. | Minimal - generally inert once seasoned, though highly acidic doughs *may* theoretically impact seasoning over prolonged, repeated use. | Requires seasoning and careful cleaning to prevent rust; not dishwasher safe. | Extremely durable; can last generations with proper care. |
| Enameled Cast Iron | Very Good - retains heat well, though typically slightly less than bare cast iron. | Minimal - the enamel coating prevents reactivity with the dough's acidity. | Generally easy to clean; often dishwasher safe (check manufacturer’s instructions). | Durable, but enamel can chip or crack with thermal shock or impact. |
| Stainless Steel | Good - distributes heat evenly, but does not retain heat as effectively as cast iron. | Minimal - stainless steel is non-reactive. | Easy to clean and often dishwasher safe. | Highly durable and resistant to corrosion. |
| Carbon Steel | Very Good - Heats up faster than cast iron, and retains a good amount of heat. | Minimal - similar to cast iron, seasoning provides a barrier. | Requires seasoning and careful cleaning to prevent rust; not dishwasher safe. | Durable, but generally lighter weight than cast iron and may warp with extreme temperature changes. |
| Aluminum | Fair - Heats quickly, but doesn't retain heat as well as other materials. | Minimal - Aluminum is non-reactive. | Easy to clean, often dishwasher safe. | Less durable than cast iron or stainless steel; can dent or warp easily. |
Illustrative comparison based on the article research brief. Verify current pricing, limits, and product details in the official docs before relying on it.

No comments yet. Be the first to share your thoughts!