
Dutch ovens and fermentation
The resurgence of interest in traditional foodways has brought fermentation back into the home kitchen. Making your own kimchi, kombucha, and other fermented delights is incredibly rewarding, and surprisingly accessible. It turns out your trusty dutch oven – often reserved for stews and braises – is an excellent vessel for the process. It’s not a new idea, really. For centuries, people have been fermenting foods in earthenware pots, and a Dutch oven is, in many ways, a modern evolution of that practice.
Cast iron, and even enameled cast iron, offers several advantages for fermentation. Its ability to maintain a remarkably stable temperature is key, minimizing fluctuations that can disrupt the delicate microbial activity. The non-reactive surface of both cast iron and enamel ensures that no unwanted flavors are imparted to your ferment. Plus, let’s be honest, a bubbling crock of kimchi looks fantastic in a beautifully seasoned Dutch oven.
While many associate Dutch ovens solely with cooking, their properties make them ideal for creating the controlled environment fermentation demands. From the even heat distribution to the ability to create an anaerobic space, a Dutch oven can simplify the process. We’ll focus on two popular ferments – kimchi and kombucha – to illustrate how you can put this versatile kitchen workhorse to work in a whole new way. These aren't the only options, but they’re excellent starting points.
Making kimchi in cast iron
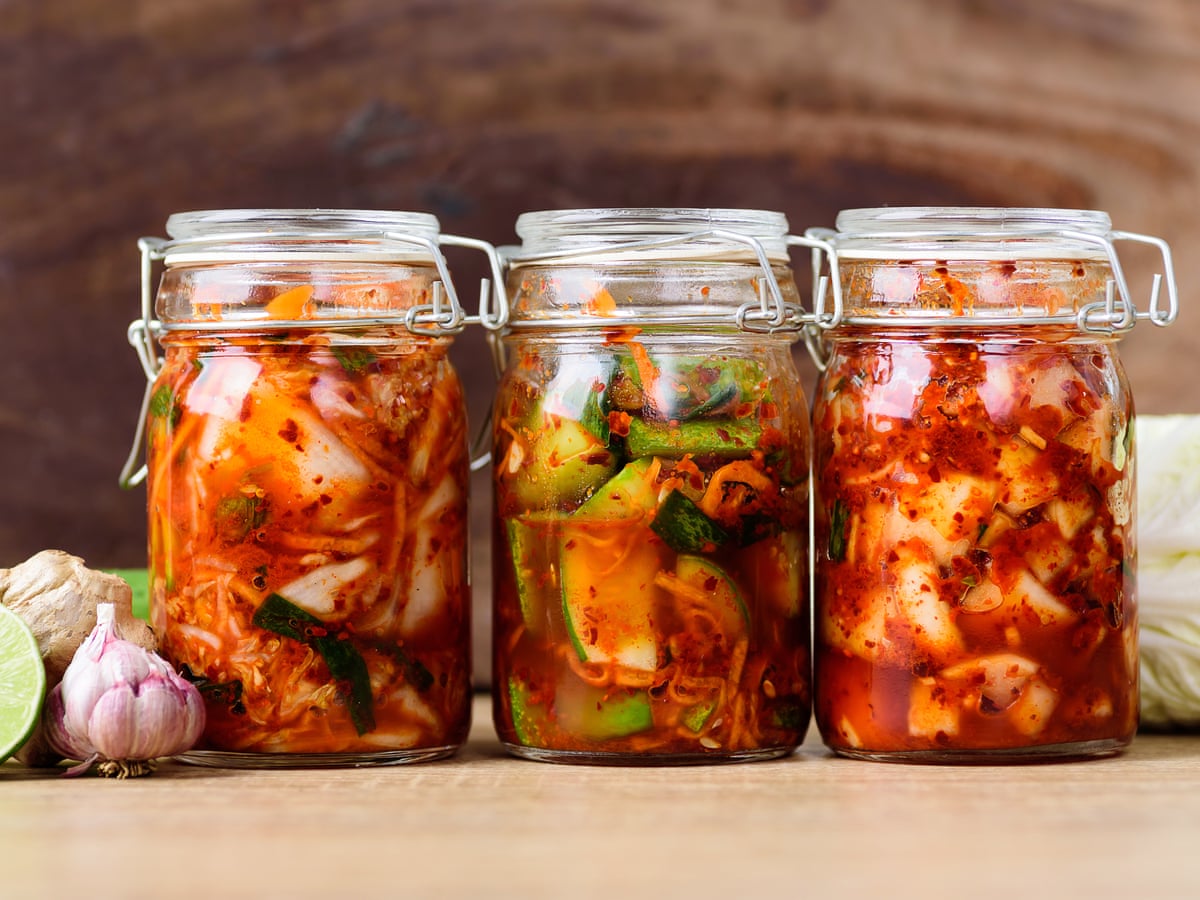
Kimchi, the spicy and umami-rich staple of Korean cuisine, is a perfect candidate for Dutch oven fermentation. The even temperature provided by the cast iron encourages consistent microbial growth, resulting in a well-balanced flavor. The weight and sturdy construction of a Dutch oven also contain any potential mess – kimchi can be a bit…enthusiastic during fermentation. And, frankly, it just looks good bubbling away in a beautiful pot.
Here’s a recipe to get you started. This is adapted from several sources, including traditional Korean methods and insights from food blogs like The Irishman's Wife (updated May 2, 2026). Adjust the gochugaru (Korean chili flakes) to your preference – kimchi can range from mildly spicy to fiery hot. This recipe yields approximately 1 gallon of kimchi.
Kimchi Recipe: 1 Napa cabbage (about 2 lbs), quartered and salted 1/4 cup kosher salt 1/2 cup gochugaru (Korean chili flakes) 1/4 cup fish sauce 2 tbsp grated ginger 4 cloves garlic, minced 1/4 cup sugar 1 cup Korean radish, julienned 1/2 cup scallions, chopped 1/4 cup carrots, julienned Soak the cabbage in salted water for 2-3 hours, flipping occasionally. Rinse thoroughly and drain. Combine gochugaru, fish sauce, ginger, garlic, and sugar in a bowl to form a paste. Add radish, scallions, and carrots. Mix well. Rub the paste all over the cabbage, ensuring every leaf is coated. Pack tightly into a clean Dutch oven, leaving about an inch of headspace. Weigh down the cabbage with a clean weight (a smaller bowl filled with water works well). Ferment at room temperature for 3-7 days, tasting daily. Refrigerate to slow fermentation.
Maintaining an anaerobic environment is crucial for successful kimchi fermentation. This means limiting oxygen exposure. The Dutch oven's tight-fitting lid, combined with the weight pressing down on the cabbage, helps create this environment. However, it's important to 'burp' the Dutch oven daily to release any built-up gases. Troubleshooting: If mold appears, discard the batch. Off-flavors can indicate improper salt levels or contamination – always use clean utensils and a clean Dutch oven.
Brewing kombucha
While kombucha is traditionally fermented in glass jars, a Dutch oven can offer some unique benefits. The thermal mass of the cast iron helps maintain a more consistent temperature, which is vital for a healthy and stable fermentation. It's a bit unconventional, I admit, but it can work surprisingly well. The biggest concern people have is whether the cast iron will react with the acidity of the kombucha.
With a properly seasoned cast iron Dutch oven, or an enameled Dutch oven, this isn't generally an issue. The seasoning creates a protective barrier, and enamel is inherently non-reactive. However, it’s best to avoid using a bare cast iron Dutch oven that is not well-seasoned for kombucha. The acidity could potentially leach iron, although this is unlikely to be harmful in small amounts. It might, however, affect the flavor.
Here’s a kombucha recipe adapted for a Dutch oven: Brew 1 gallon of strong black tea. Dissolve 1 cup of sugar in the hot tea. Let cool to room temperature. Add 1 cup of starter kombucha from a previous batch. Add a SCOBY (Symbiotic Culture Of Bacteria and Yeast). Pour into a clean, well-seasoned (or enameled) Dutch oven, leaving a few inches of headspace. Cover with a breathable cloth (cheesecloth works well) secured with a rubber band. Ferment at room temperature (70-75°F) for 7-30 days, tasting periodically. Bottle and refrigerate when desired tartness is reached. Handle the SCOBY gently and store it in starter tea between batches.
Managing temperature
Fermentation is incredibly sensitive to temperature. Different bacteria thrive at different temperatures, and even small fluctuations can significantly impact the flavor and success of your ferment. This is where the Dutch oven truly shines. Its thermal mass – its ability to absorb and retain heat – helps buffer against temperature swings in your kitchen.
If your kitchen is prone to large temperature variations, consider using a warming mat under the Dutch oven to provide a gentle heat source. Alternatively, you can wrap the Dutch oven in a towel or blanket to insulate it. Conversely, if your kitchen is too warm, placing the Dutch oven in a cooler location, like a basement or pantry, can help regulate the temperature. Ideal temperature ranges are 68-78°F for kimchi and 70-75°F for kombucha, though these can vary depending on the specific strains of bacteria involved.
Consistency matters more than hitting a specific degree. Cooler spots usually make kombucha more acidic, while a warmer corner can speed up the funk in your kimchi. Don't overthink it; just try to avoid placing the pot right next to a drafty window or a hot stove.
Dutch Oven vs. Glass Jar Fermentation: A Comparative Overview (2026)
| Feature | Dutch Oven | Glass Jar |
|---|---|---|
| Temperature Stability | Generally more stable due to cast iron's thermal mass, buffering against rapid room temperature fluctuations. | More susceptible to temperature swings; ambient temperature directly impacts fermentation. |
| Ease of Insulation | Easier to insulate using wraps, blankets, or placement within a cooler to maintain consistent temperatures. | Insulation requires more creative solutions and may be less effective due to the jar's shape and material. |
| Temperature Monitoring | Requires lifting the lid, which can disrupt the fermentation environment, or using a thermometer inserted through a tight-fitting lid. | Easier to visually monitor and take temperature readings without significantly disturbing the process. |
| Overall Control | Offers potential for more consistent temperatures, but monitoring requires more care to avoid disruption. | Provides easier monitoring, but maintaining a stable temperature can be challenging without external aids. |
| Airflow | Cast iron lids, while tight-fitting, may allow for *some* minimal airflow, potentially influencing microbial activity. | Glass jars with airlocks provide controlled airflow, managing gas release during fermentation. |
| Material Reactivity | Cast iron is generally inert once seasoned, but some concern exists regarding potential leaching with highly acidic ferments over extended periods. | Glass is non-reactive and considered safe for all fermentation types. |
Illustrative comparison based on the article research brief. Verify current pricing, limits, and product details in the official docs before relying on it.
Cleaning and seasoning
Cleaning a Dutch oven after fermentation requires a gentle touch. Avoid harsh soaps and abrasive scrubbers, as these can damage the seasoning (in the case of bare cast iron) or the enamel. For bare cast iron, simply rinse with warm water and use a soft sponge or brush. You may need to gently scrape away any stuck-on residue. For enameled Dutch ovens, warm soapy water and a soft sponge are usually sufficient.
If you're using a bare cast iron Dutch oven, it’s important to re-season it after each use to maintain its protective coating. After cleaning and drying, lightly coat the interior with a thin layer of oil (flaxseed oil is a popular choice) and heat in the oven at 350°F for an hour. Flavors can linger in cast iron, so occasionally making a batch of something with a strong flavor (like chili) can help 'reset' the seasoning.
Enameled Dutch ovens are much easier to clean and don’t require seasoning. However, be careful not to chip the enamel, as this can create areas where bacteria can grow. Avoid using metal utensils that could scratch the surface. Remember, proper care will ensure your Dutch oven remains a reliable fermentation vessel for years to come.
Other ferments to try
Kimchi and kombucha are just the beginning. The Dutch oven’s stable temperature and enclosed environment make it suitable for a wide range of fermentations. Consider making pickles, sauerkraut, or even yogurt (although temperature control can be more challenging with yogurt). You could even attempt miso, although that’s a much longer-term project, requiring months or even years of fermentation.
The key is to understand the basic principles of fermentation – creating the right environment for beneficial bacteria to thrive – and adapting the process to the unique characteristics of your Dutch oven. Don't be afraid to experiment and explore new flavors. The Dutch oven isn’t just for cooking; it’s a versatile tool for preserving and transforming food in exciting ways.
Fermentation Projects
- Kimchi - A traditional Korean fermented cabbage dish. Dutch ovens provide a stable, cool environment for fermentation. (Medium)
- Kombucha - Fermented sweetened tea. A large Dutch oven can easily house a brewing vessel. (Medium)
- Sauerkraut - Fermented cabbage, similar to kimchi but with a different spice profile. The weight of a lid helps keep the cabbage submerged. (Easy)
- Pickled Vegetables - Beyond cucumbers, you can pickle carrots, green beans, beets, and more! Dutch ovens offer consistent temperature. (Easy)
- Yogurt - While traditionally made in yogurt makers, a Dutch oven can maintain a consistent temperature for incubation, especially when paired with a warming element or insulated well. (Medium)
- Miso - A longer-term fermentation project involving soybeans, koji, and salt. Requires a very stable temperature and environment. (Challenging)
- Sourdough Starter - Maintaining a sourdough starter benefits from a stable temperature. A Dutch oven can help regulate this, especially in cooler kitchens. (Easy)
No comments yet. Be the first to share your thoughts!