
Why use a dutch oven?
Dutch oven bread is popular because it works. The heavy lid traps steam, which keeps the crust soft long enough for the bread to expand. This gives you that professional blistered crust and airy interior without needing a steam-injection oven. Most of these recipes are no-knead, so you don't need a stand mixer or a lot of arm strength to get a great loaf.
Dutch ovens themselves have a long history. Originally developed in the Netherlands (hence the name) in the 17th century, these heavy cast iron pots were prized for their ability to cook food evenly over an open fire. They traveled with settlers to North America and became staples in pioneer kitchens. Now, there’s been a clear resurgence in their use, and for good reason: they’re incredibly versatile and durable.
Sourdough, while currently enjoying a trendy moment, is far from new. It’s one of the oldest forms of leavened bread, dating back to ancient Egypt. What sets sourdough apart is its reliance on a "starter" – a living culture of wild yeasts and bacteria – rather than commercial yeast. This process creates a more complex flavor profile and offers potential health benefits, like improved digestibility. Mastering sourdough in a Dutch oven feels like connecting with a centuries-old tradition.
Keeping your starter alive
Your sourdough starter is the heart and soul of the process. It’s a symbiotic culture of lactic acid bacteria and wild yeasts, and essentially, it is the leavening agent for your bread. Creating a starter takes time and patience, but it’s incredibly rewarding. The initial process involves combining flour and water and allowing the natural yeasts present in the flour to ferment.
A typical feeding schedule involves discarding a portion of the starter (usually half) and then "feeding" it with fresh flour and water. This keeps the culture active and healthy. I recommend feeding your starter once a day if kept at room temperature, or once a week if stored in the refrigerator. The ratio is often 1:1:1 – equal parts starter, flour, and water by weight. For example, 50g starter + 50g flour + 50g water.
Signs of an active starter include a doubling in size within a few hours of feeding, a bubbly texture, and a slightly tangy aroma. Problems can arise, though. Mold indicates contamination and the starter needs to be discarded. A starter that doesn’t rise might be too cold, or it may need more frequent feedings. You can revive a neglected starter by feeding it regularly for several days, gradually increasing the frequency.
The type of flour you use impacts your starter. Whole wheat flour contains more nutrients and microorganisms, which can jumpstart the fermentation process. However, all-purpose flour works perfectly well, particularly for maintaining a stable starter long-term. Experiment with different flours to see what yields the best results in your environment. I’ve found a mix of bread flour and whole rye flour creates a robust and flavorful starter.
- Day 1: Mix 50g flour and 50g water in a jar. Leave it on the counter with a loose lid.
- Day 2-7: Discard half of the starter and feed with 50g flour and 50g water daily.
- Day 8 onwards: Observe for signs of activity. Once consistently doubling in size within 4-8 hours of feeding, it’s ready to use.
Recipe: Classic Dutch Oven Sourdough
This recipe aims for a balance of simplicity and quality, producing a consistently delicious loaf. It utilizes a relatively high hydration dough, which contributes to an open crumb structure. Don’t be intimidated by percentages – they simply provide a consistent way to scale the recipe.
Ingredients: 400g bread flour, 300g water (75% hydration), 100g active sourdough starter, 8g salt (2%).
Instructions: 1. In a large bowl, combine flour and water. Mix until just combined – this is the autolyse step, allowing the flour to fully hydrate. Let rest for 30-60 minutes. 2. Add starter and salt. Mix thoroughly, using your hands or a dough scraper. 3. Perform a series of stretch and folds every 30-60 minutes for the next 2-3 hours. This develops gluten strength without kneading. 4. After the bulk fermentation, gently shape the dough into a round or oval. 5. Place the shaped dough in a well-floured banneton basket or a bowl lined with a floured cloth. 6. Cover and refrigerate overnight (or for up to 24 hours).
The autolyse step is crucial, as it allows the flour to absorb water fully, promoting gluten development and a more extensible dough. Dough hydration is key; 75% hydration means the water weight is 75% of the flour weight. Adjust the water slightly depending on your flour’s absorption capacity. Timing is flexible; the bulk fermentation can last longer or shorter depending on room temperature. A warmer kitchen will accelerate the process.
Mastering heat and steam
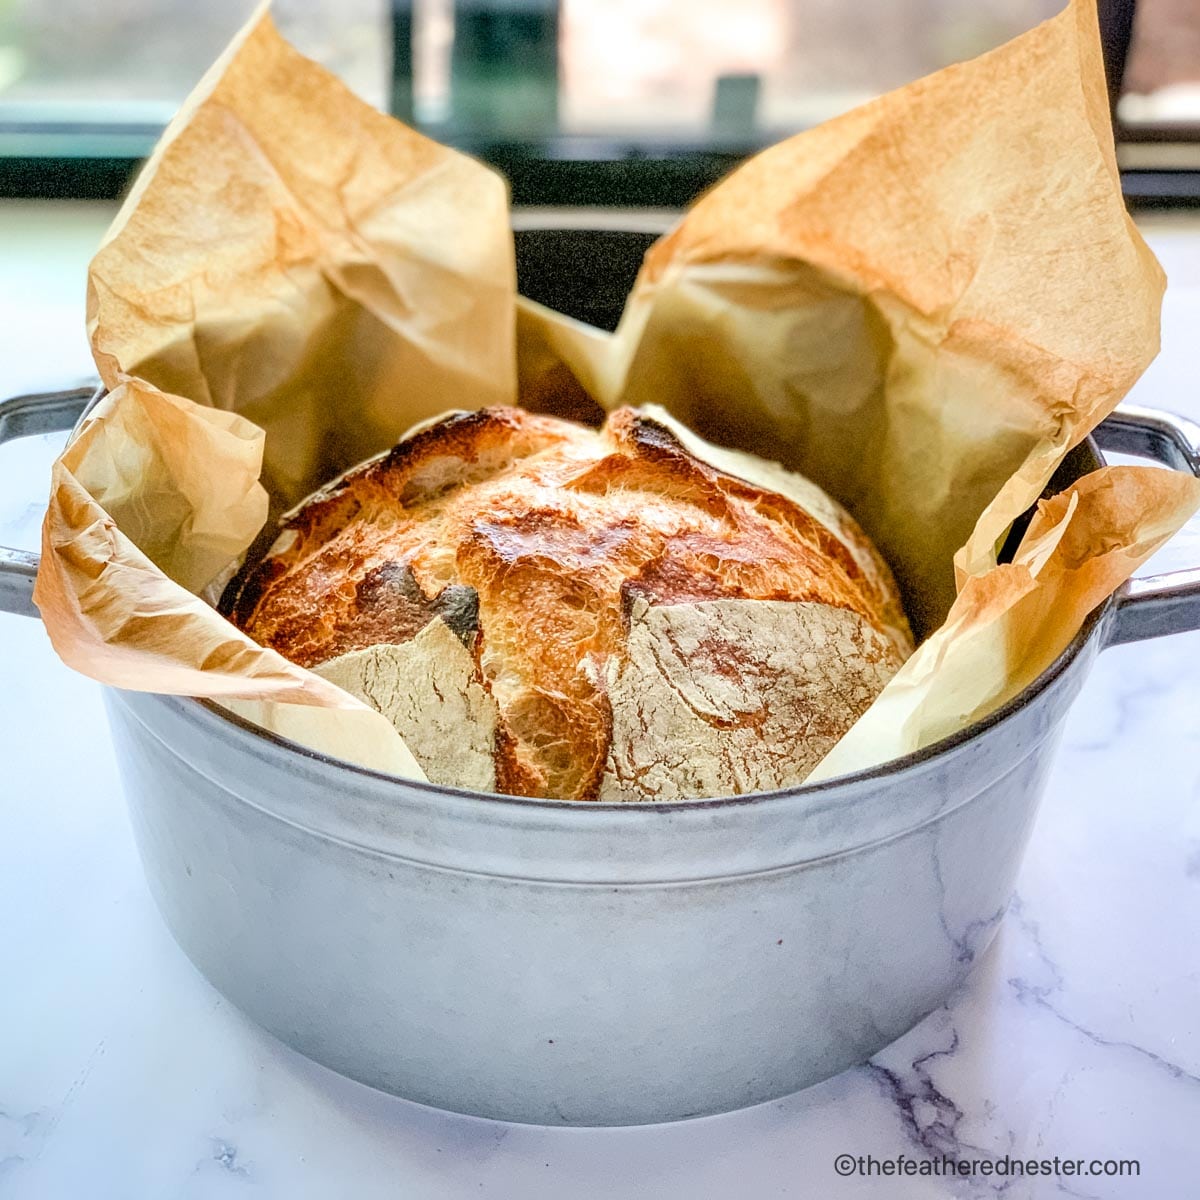
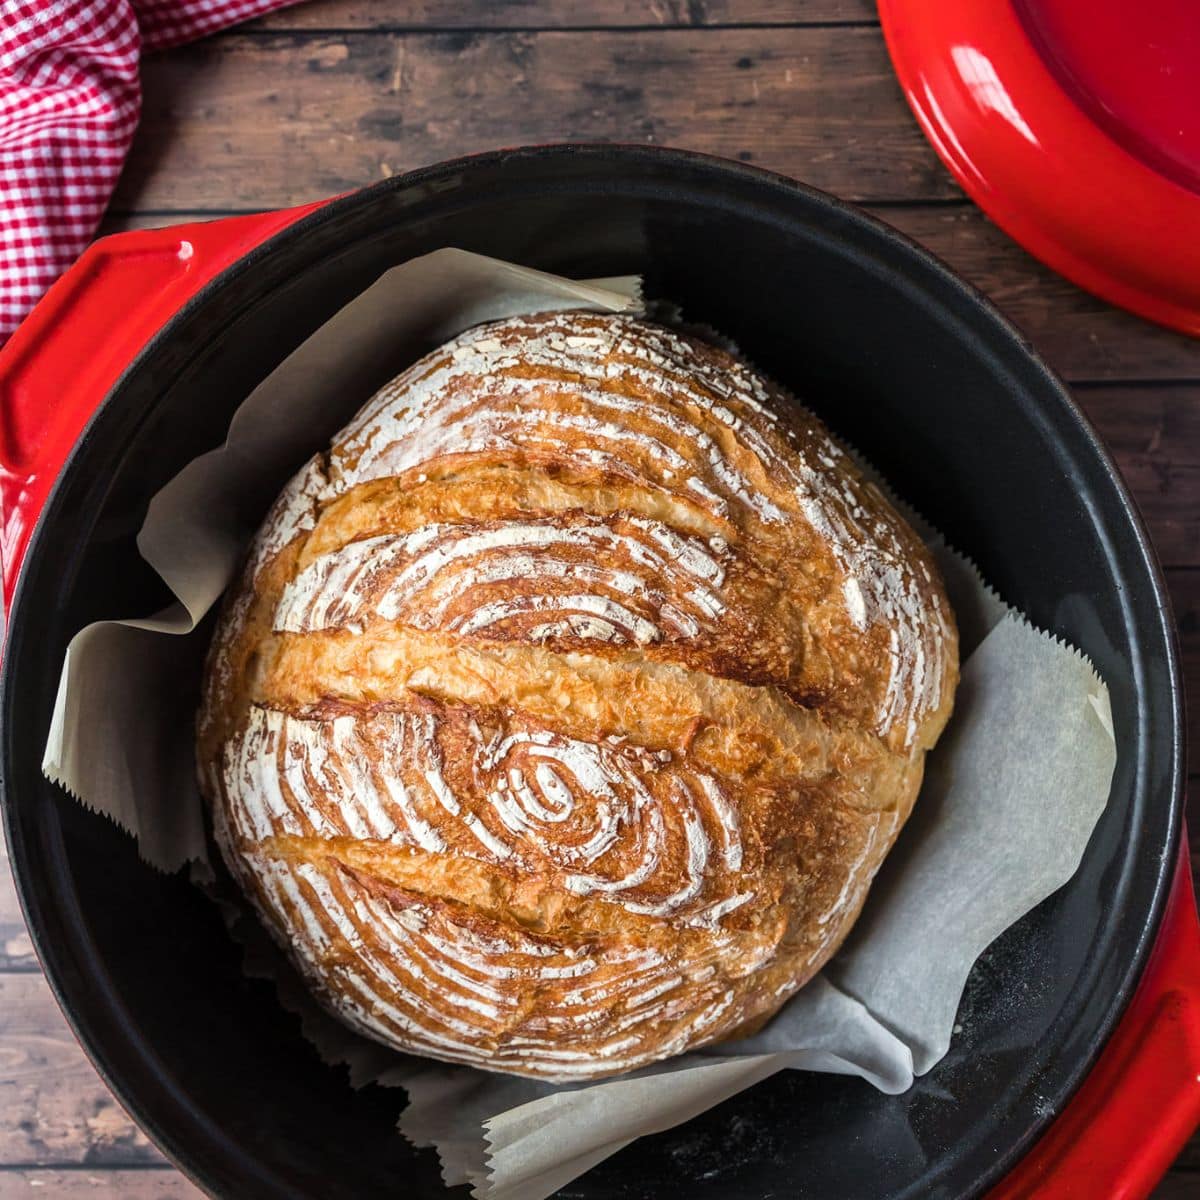
The Dutch oven creates a unique baking environment by trapping steam. This steam slows down crust formation early in the baking process, allowing the dough to expand fully before the crust sets. The result is a lighter, airier crumb and a beautifully blistered crust. Preheating the Dutch oven is absolutely essential.
I recommend preheating your Dutch oven, with the lid on, at 450°F (232°C) for at least 30 minutes. A longer preheat ensures the pot is thoroughly heated. Carefully remove the hot Dutch oven from the oven. Gently lower the dough into the pot using a parchment paper sling – this makes removal much easier. Score the dough with a sharp knife or lame to control expansion.
If your Dutch oven isn’t perfectly seasoned, don’t worry. A well-seasoned Dutch oven is less prone to sticking, but a parchment sling will prevent issues regardless. Ensure the lid is securely on for the first 20-25 minutes of baking, then remove it to allow the crust to brown and crisp up. Baking time will typically be around 45-50 minutes total.
Troubleshooting: Common Baking Issues
Even with a solid recipe and technique, things can sometimes go wrong. A flat loaf often indicates a weak starter or insufficient gluten development. Ensure your starter is active and perform enough stretch and folds during bulk fermentation. A gummy interior suggests underbaking or too much hydration. Bake for longer or reduce the hydration slightly in your next attempt.
A burnt crust usually means the oven temperature is too high or the baking time is too long. Reduce the temperature or shorten the baking time. Uneven rise can be caused by uneven heat distribution in your oven or improper shaping of the dough. Rotate the Dutch oven during baking and practice your shaping technique.
Don't be discouraged by failures. Sourdough baking is a learning process. Keep detailed notes on your process – flour type, hydration, fermentation time, oven temperature – and adjust accordingly. Each loaf is an opportunity to refine your skills and achieve better results. Refer back to the sections on starter health and hydration for specific solutions.
Beyond the Basic: Flavor Variations
Once you’ve mastered the basic sourdough recipe, the possibilities for customization are endless. Adding seeds like sesame, poppy, or sunflower seeds adds texture and flavor. Incorporating nuts like walnuts or pecans brings a richness to the loaf. Dried fruits, such as cranberries or apricots, offer a touch of sweetness.
You can also experiment with herbs and cheeses. Rosemary and olive sourdough is a classic combination. Cheddar and jalapeño sourdough provides a savory kick. When adding mix-ins, aim for around 100-200g per 400g of flour. Incorporate them during the stretch and fold process.
Scoring patterns aren't just aesthetic; they influence how the bread expands during baking. A simple single slash allows for a dramatic "ear". More intricate designs require practice but can create stunning visual effects. Experiment with different patterns to find what you enjoy.
Dutch Oven Care: Maintaining Your Investment
Proper care will ensure your Dutch oven lasts for generations. Seasoning is key – it creates a natural non-stick surface and protects the cast iron from rust. After each use, scrape out any food residue and wash the Dutch oven with hot water (avoid soap, especially for bare cast iron). Dry it thoroughly and lightly coat it with oil.
Avoid abrasive cleaners and scouring pads, as they can damage the seasoning. If rust appears, scrub it off with steel wool and re-season the Dutch oven. Enameled Dutch ovens are easier to clean, but avoid thermal shock (don’t plunge a hot pot into cold water).
There's a common myth that you can’t use soap on cast iron. While it’s true that harsh detergents can strip the seasoning, a small amount of mild dish soap is generally safe for enameled Dutch ovens, and even bare cast iron can tolerate it occasionally if dried and oiled immediately. The most important thing is to maintain a protective layer of oil.
Sourdough Resources
- Tartine Bread by Chad Robertson – A foundational text for modern sourdough baking, detailing the techniques developed at Tartine Bakery in San Francisco. Focuses heavily on flour selection and minimal handling. 🍞
- Flour Water Salt Yeast by Ken Forkish – Offers a more approachable entry point to sourdough, with detailed explanations of the science behind the process and a range of recipes. Includes both straight dough and no-knead methods. 🌾
- The Perfect Loaf website (theperfectloaf.com) – Run by Maurizio Leo, this site provides comprehensive guides, recipes, and troubleshooting advice for sourdough bakers of all levels. Includes detailed photography and video tutorials. 💻
- King Arthur Baking website (kingarthurbaking.com) – A well-established resource for all things baking, with a robust sourdough section featuring recipes, articles, and a helpful baking hotline. 👑
- Pro Home Cooks YouTube channel – Mike Greenfield offers clear and concise sourdough tutorials, often focusing on practical techniques and common mistakes. His videos are particularly useful for visual learners. 📹
- Breadtopia website (breadtopia.com) – Specializes in sourdough supplies and offers a wealth of information on sourdough baking, including detailed guides on starter maintenance and flour selection. 🌾
- Reddit’s r/Sourdough forum – A vibrant online community where bakers share their experiences, ask questions, and provide feedback on each other's loaves. A great place to find inspiration and get personalized advice. 💬

No comments yet. Be the first to share your thoughts!